When we talk about how to make a book in 2022, we often talk about exporting files to kindle and other ebook readers. but what about the ancient art of making a book by hand? some say bookbinding is a dying art, but we think it’s making a comeback.
In this post, we will show you how to make a beautiful book. Not just any blank tome, but a beautiful novel, memoir, or non-fiction book, formatted to a professional standard and bound in a hardcover. And the best part is that it shouldn’t cost you more than fifteen or twenty dollars!
You are reading: How to make books
So if you’ve written a work of fiction or nonfiction and want to know how to make a copy that you can give to someone special (or keep as a keepsake), simply follow all the steps below. or if you want to create a blank notebook, feel free to skip to step four.
You will learn to:
- compile the content for the project
- format the pages
- print the book on paper
- assemble the binding for the spine
- create the board book cover
- put the pieces together to make your book
- design a dust jacket
1. compile the content for the project
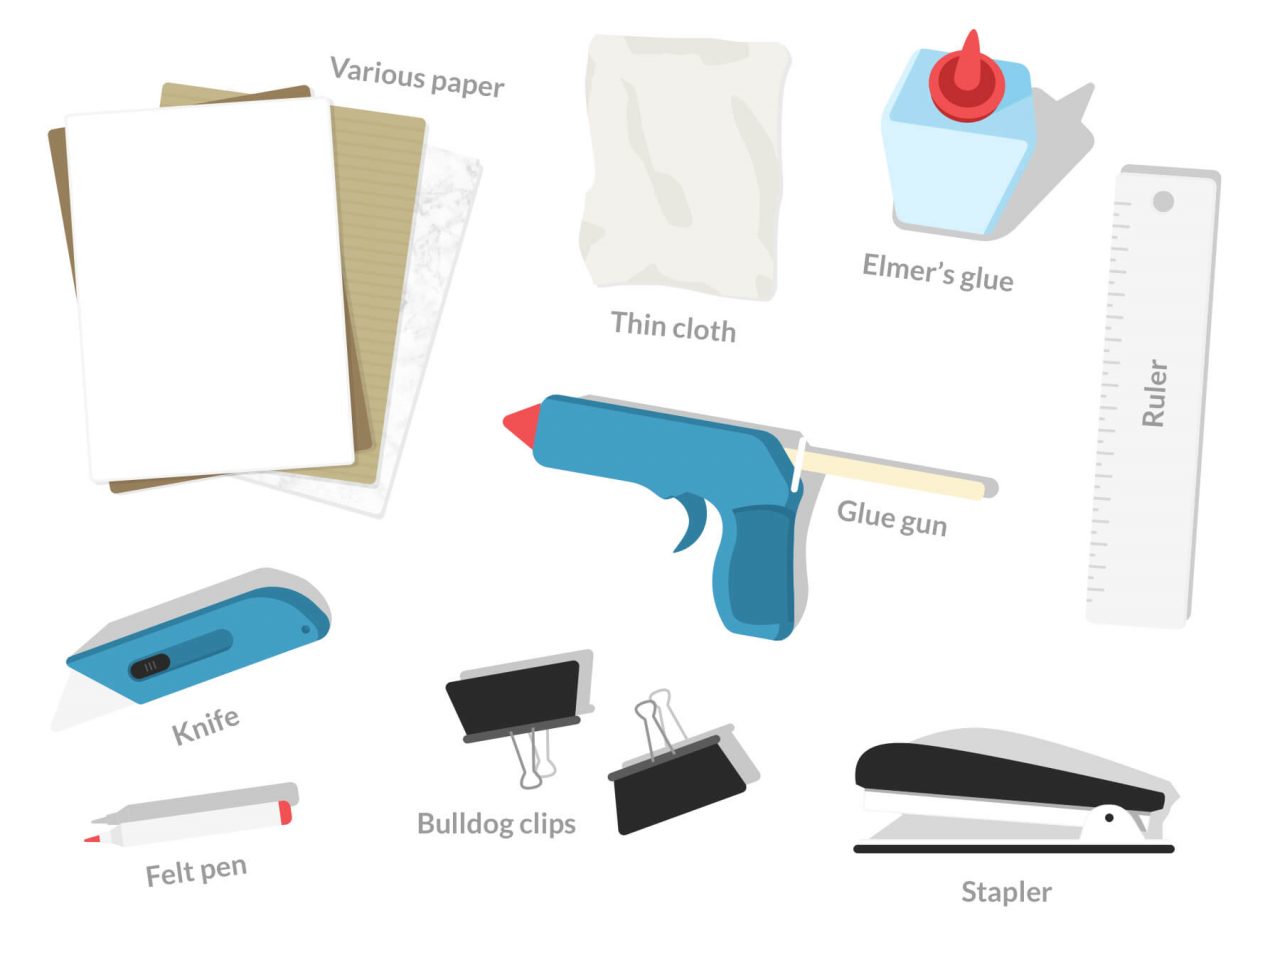
This is what you will need:
- printing paper (a4 or letter size), uncoated 70-80 g/m²
- 2 sheets of decorated paper (a4 or letter size), 90-100 g/m²
- elmer’s glue (or pva glue)
- hot glue gun(they cost, like, ten dollars)
- craft knife
- large bulldog clips
- good quality cloth or paper (for the cover)
- thin cloth (perhaps a large handkerchief or special book cloth)
- metal ruler
- marker pen
- stapler
- high- quality cardboard
Once you have these ‘ingredients’ in place, you’re ready to learn how to make a book.
2. format the pages
This is where we digitally typeset the book of your choice and arrange the pages in a way that will help us bind it smoothly. there are some pieces of software that will allow you to compose a book. however, we recommend that you use the reedsy book editor, for three reasons:
- creates print-ready, professional-grade files that are easy to read
- no training required and almost no learning curve
- it’s free
As it happens our reedsy team did it, but that’s how we know it would be one of the best tools for the job, even if it wasn’t free. automatically creates your copyright page and handles text like a dream. To see how to use the editor to format your book, watch this video made by our designer, Matt:
tip: If you want to create your own special edition of a classic title, head over to the gutenberg project and download the text of thousands of titles now in the public domain.
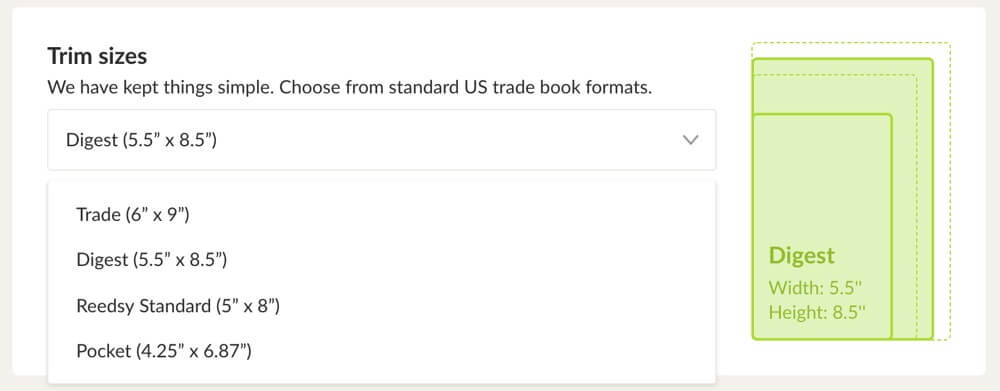
When you export your book, you’ll get several crop size options. select digest (5.5″ x 8.5″), which is exactly the size of a sheet of paper folded in half.
then once you have exported your file as a pdf you can continue with the printing process.
3. print the book on paper
If you were to tear apart almost any hardcover edition, you’d find that they’re actually made from individual paper booklets held together with glue or thread. these are called folios and are made up of folded “signatures”.
what is a signature?
A signature is a single sheet of paper with pages of text printed on both sides. they are folded (and sometimes cut) before being assembled into a folio, which is essentially a booklet.
fun fact: the number of pages in a publication is always a multiple of four, often 16 or 32 pages. that’s why you often see blank pages at the end of a book.
See Also: 12 of the best bedtime books to help you sleep soundly – Tolstoy Therapy
For our project, the signatures will be single sheets of letter-sized paper with two pages printed on each side. We will assemble eight signatures into folios that house 32 pages of our book. Because of how each piece of paper nestles into this arrangement, each signature must be printed in a specific order — and we’ll show you how to do that.
download adobe acrobat pro
since we’re dealing with pdf files, why not use the tool created by the people who invented pdf? Adobe Acrobat Pro is a paid tool, but the good news is that almost all of Adobe’s creative software comes with a 30-day free trial.
once you have downloaded the software, open the pdf file.
make sure your pages are tagged correctly
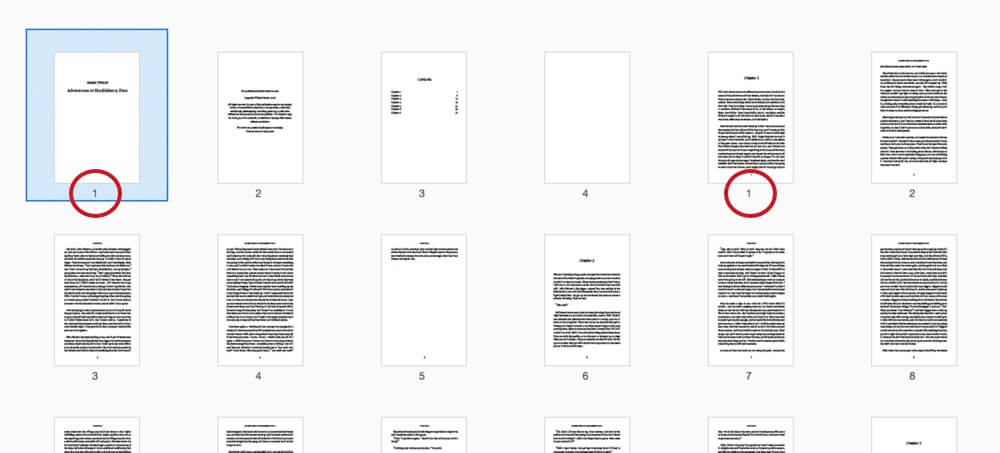
when you first open the file in adobe, select “organize pages” to see all your pages arranged.
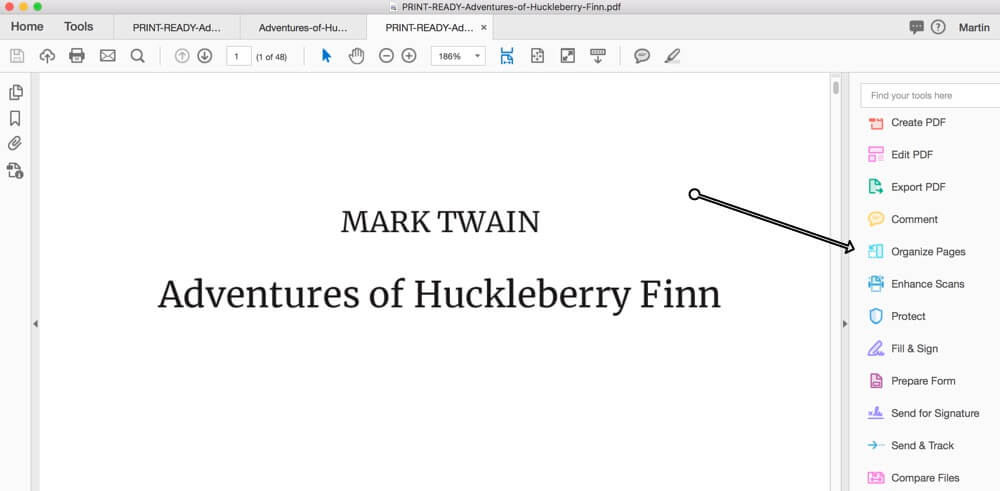
The first thing to check is that all the pages are numbered correctly. if you see the page numbers return to 1 after the cover page (title page, copyright page, etc), you will need to reset the page tags for it to print correctly:
See Also: Which book genre is the most popular?
if this is the case, right click on the first page and choose ‘page numbering’. then where “selected” is highlighted, change the setting to ‘all’.
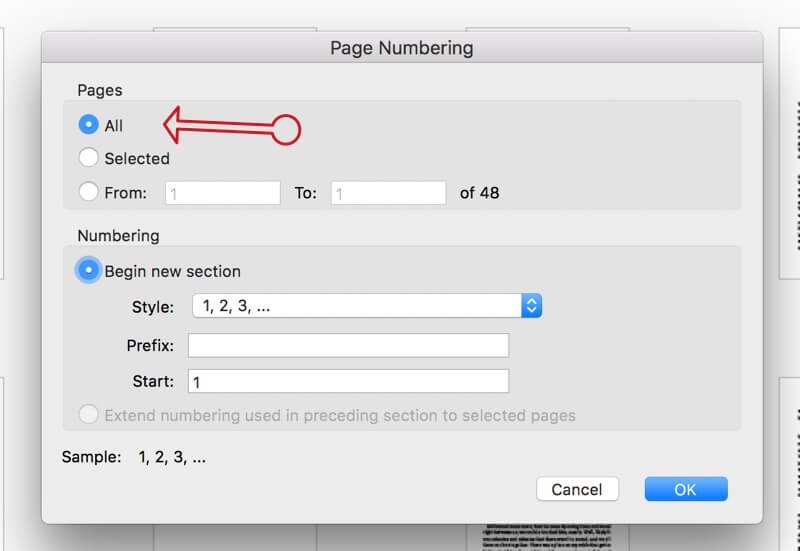
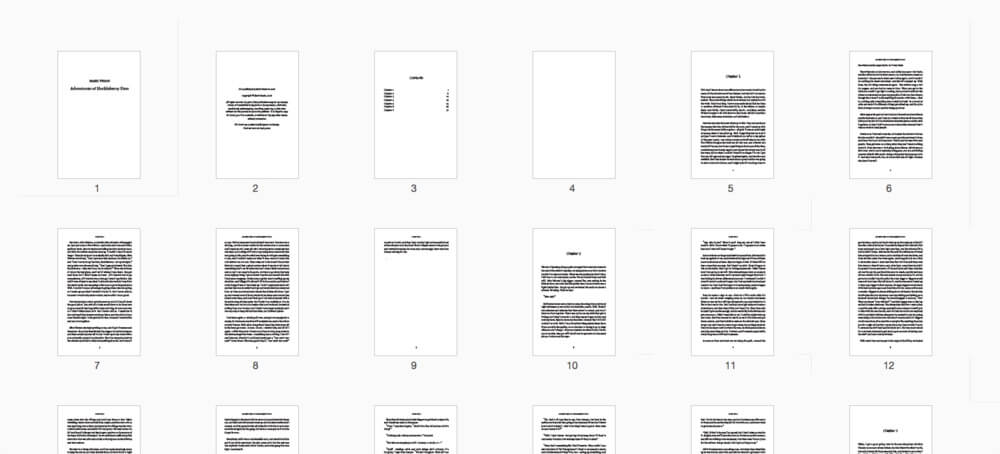
this will label all the pages sequentially and you are almost ready to print!
print your book in 32 page booklets
press ‘print’ and you will see the option to print a booklet which will properly organize your book into signatures. however, to make sure you don’t just produce a single unwieldy booklet, print the 32-page book at a time. this is how you do it:
- select ‘pages’ and type 1 to 32.
- in ‘page size & handling,’ select ‘brochure’:
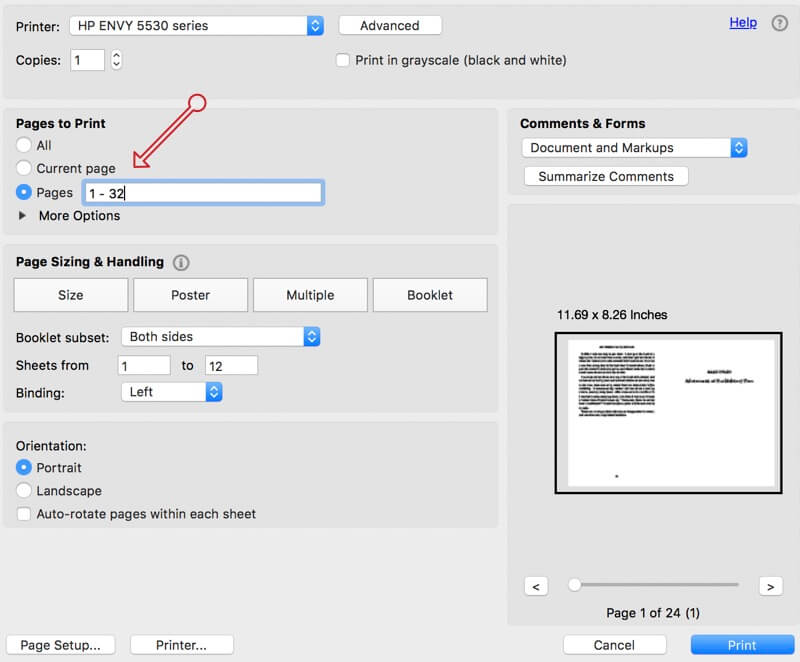
- then print pages 1 to 32.
- the pages should print on both sides of the paper. if your printer supports “duplex printing”, it will automatically print on both sides. otherwise you will have to flip the papers halfway.
- You will now have the first 32 printed pages.
- then repeat the process with:
- pages 33 – 64
- pages 65 – 96
- pages 97 – 128
- and so on…
You may want to print multiple copies. if you make a mistake later in the process, you won’t have to start over. or, if you want to try multiple times to make a perfectly bound copy, this will give you that wiggle room.
Top tip: If this sounds too complex, you can go to your local copy shop (kinkos, et al) and explain to the assistant what you are doing. they will be more than happy to help.
choose the right paper
A large part of the reading experience comes from feeling the paper under your fingers as you flip through the pages, so selecting the right paper type is essential. if the paper is too thin and light, it will be more delicate during the binding process. if you choose a paper that is too heavy and thick, then you will have trouble folding signatures (and keeping your novel from looking like a doorstop).
You can get your article online. Or, better yet, go to a stationery store where you can stock up on it before you buy it. If your goal is to create a book that feels professional, our advice is to look for a paper type that is:
- uncoated
- 70 or 80 g/m² (grams per square meter)
if you like the idea of using recycled paper, great. just take a look at a sample before you commit to buying a ream.
4. assemble the spine join
You should now have the entire book printed and separated into folios made up of eight sheets of paper (on which 32 pages are printed).
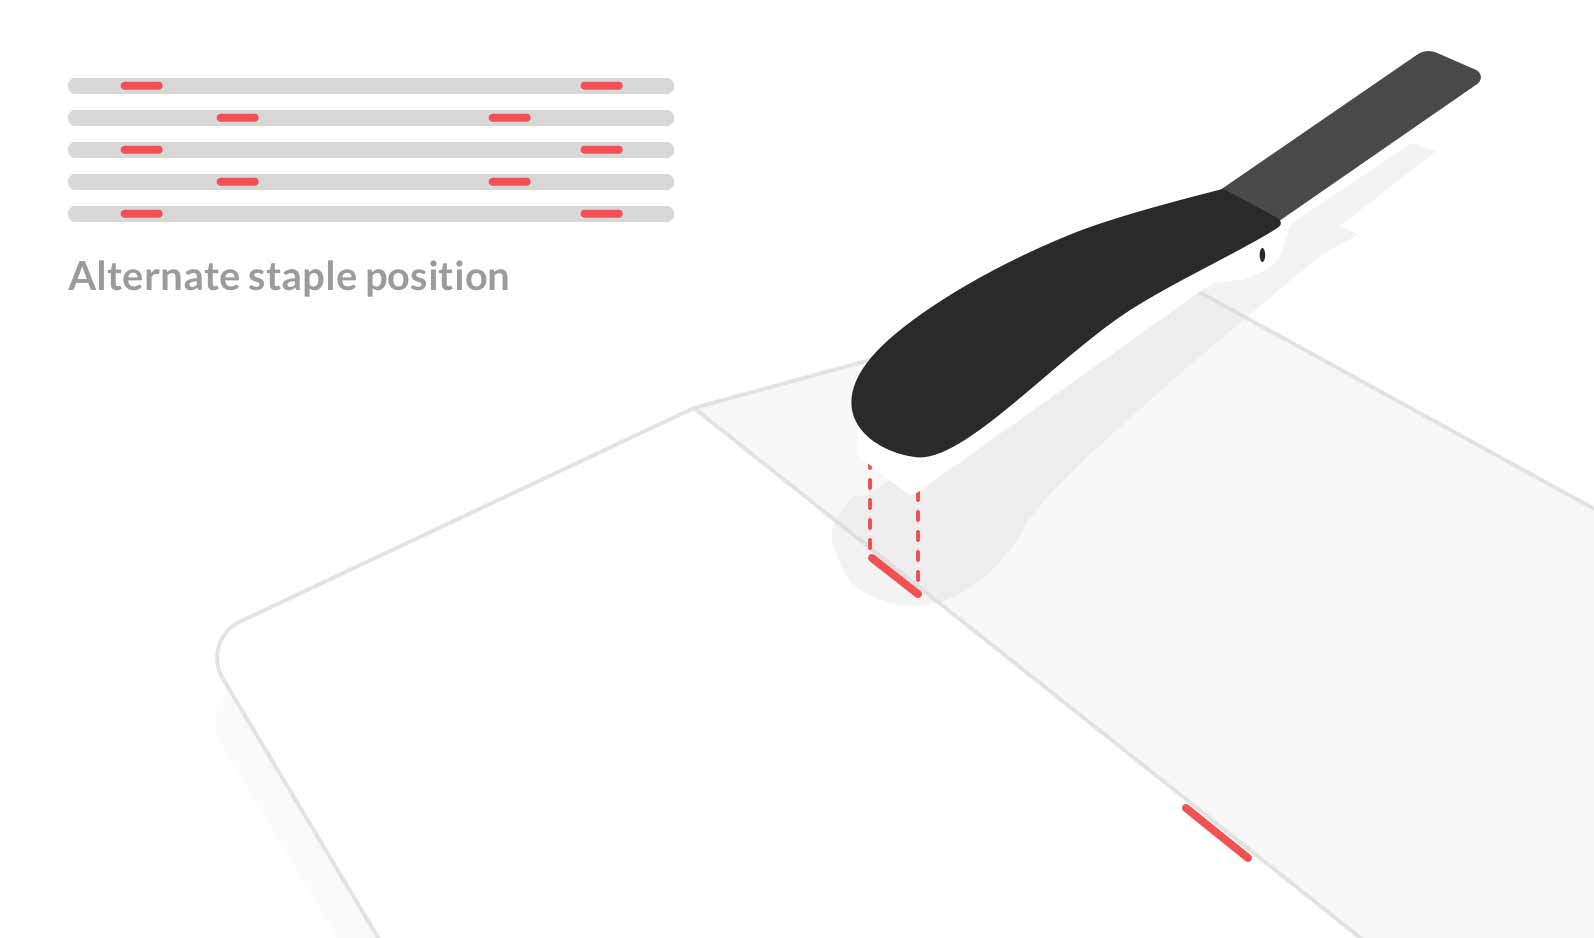
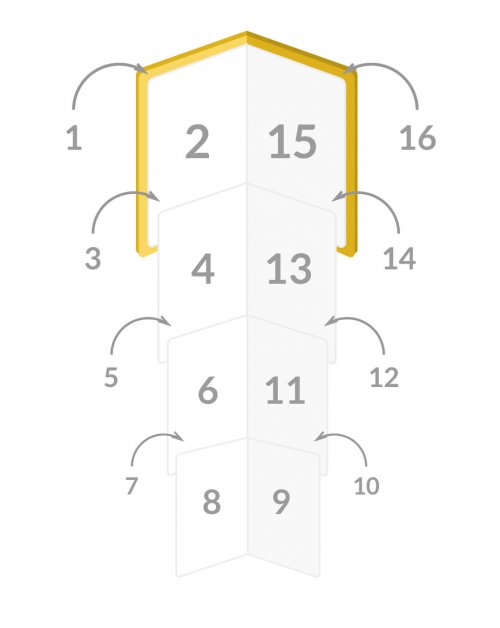
Take the sheets on which pages 1 – 32 are printed and carefully fold them in half, taking care to do so in the correct direction. then carefully assemble them in the correct order and use an open stapler to secure them together as follows:

you can staple them to a folded bath towel or an old pair of jeans so you don’t damage the table. you’ll also need to bend the ends of the staples with your own hands (or use a metal ruler, if you want to save your fingers).
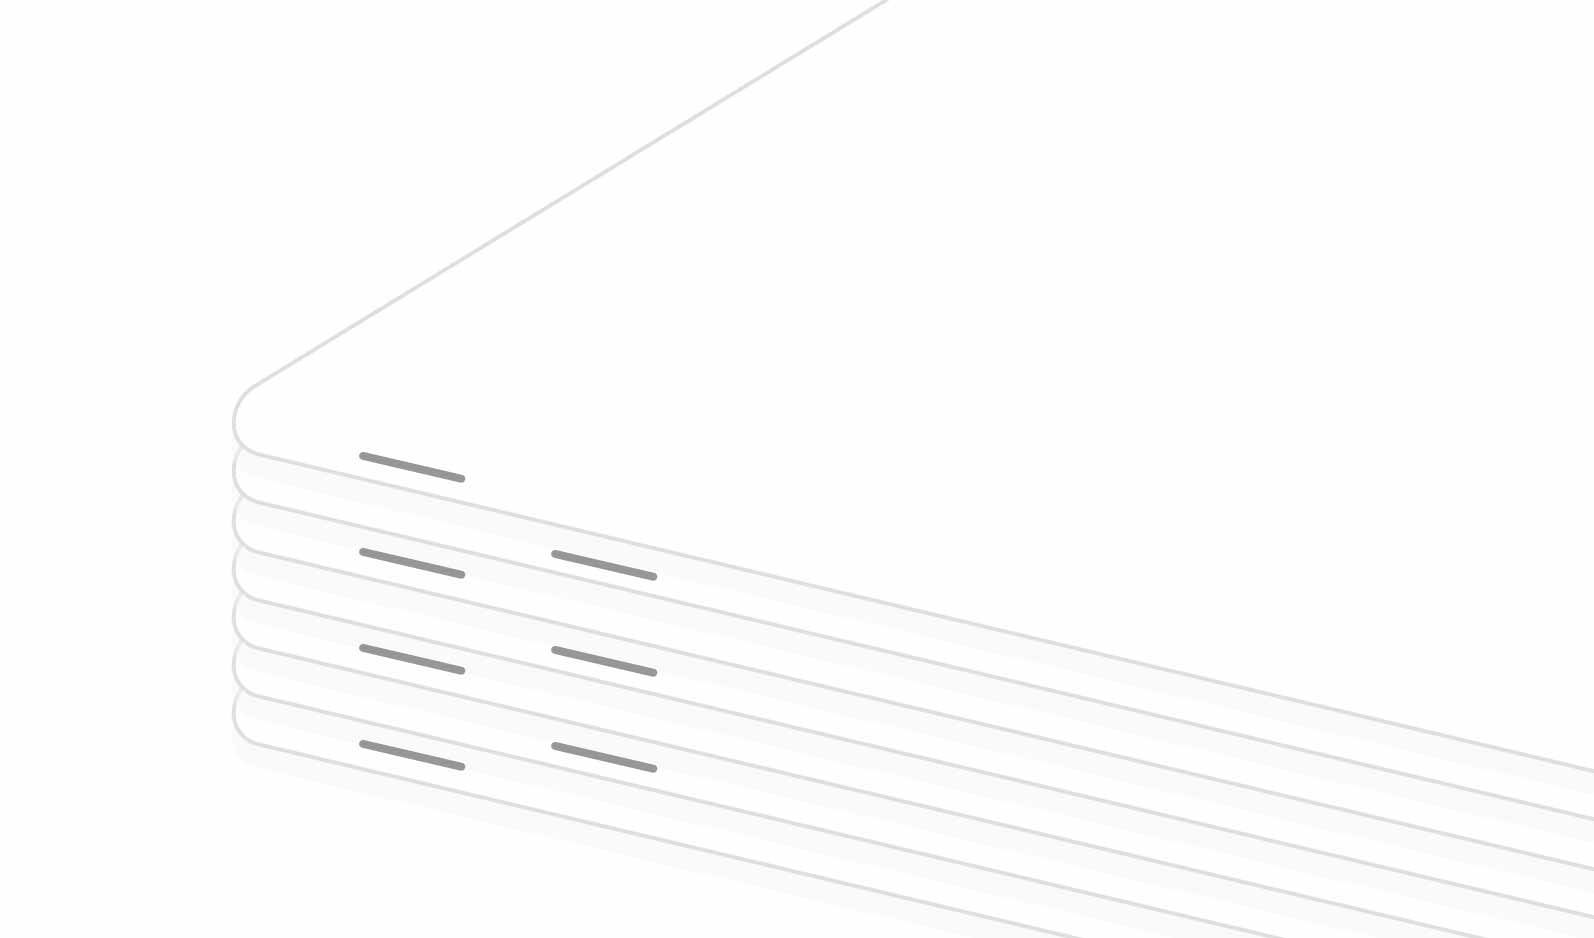
Between folios, you’ll need to alternate where you place the staples on the spine so they don’t stick out in places. you can arrange them as in the diagram above.
you’ll want the pages to be folded as tightly as possible; To accomplish this, you can tie them together with a rubber band and then compress them under a stack of hardcovers and other heavy objects. if you want, you can leave them there overnight.
and there you have it: your entire book, in a stack of 32-page folios.
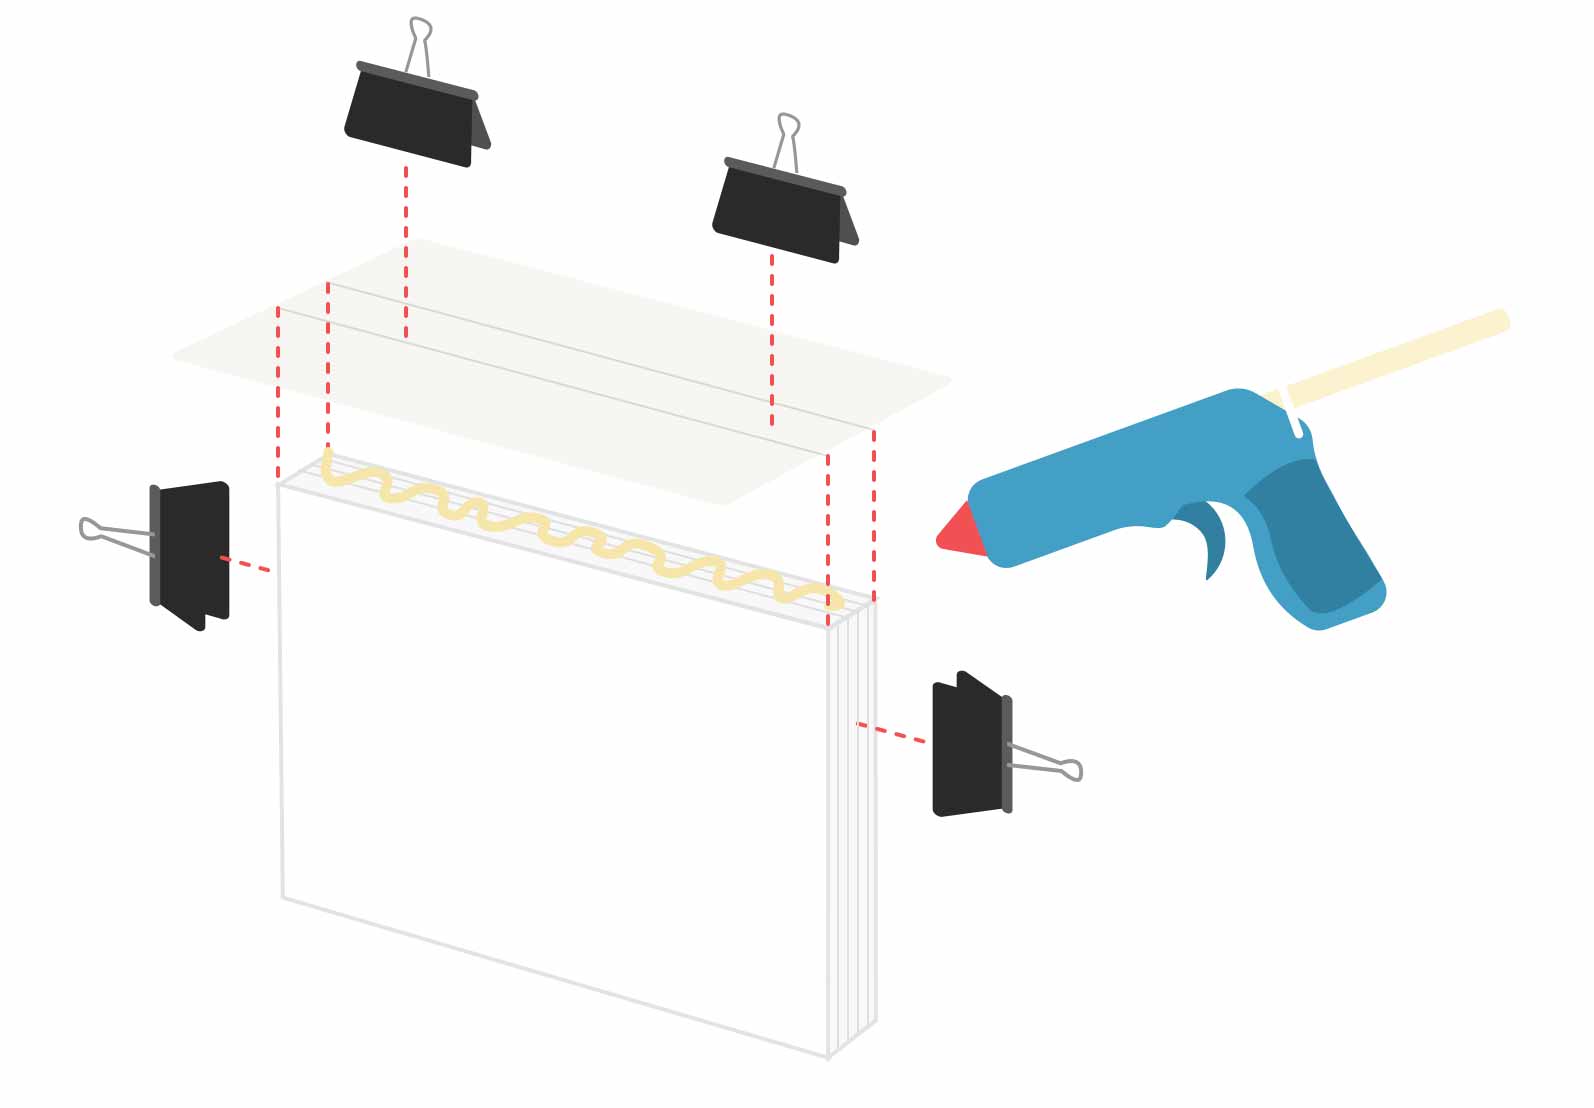
Now it’s time to join these folios together. In some binding processes sewing is used to join the pages, but in our case we will use hot glue.
Keep your post stack in order with your bulldog clips. Apply hot glue along the spines of the folios, being careful not to use too much glue so that it drips between the folios.
See Also: Sophie Hannah – Book Series In Order
Before the glue cools, apply the fabric to the spine. the fabric should only adhere to the edge of the book spine; the sections that fall on the front and back covers must be free. secure the fabric and folios with bulldog clips.
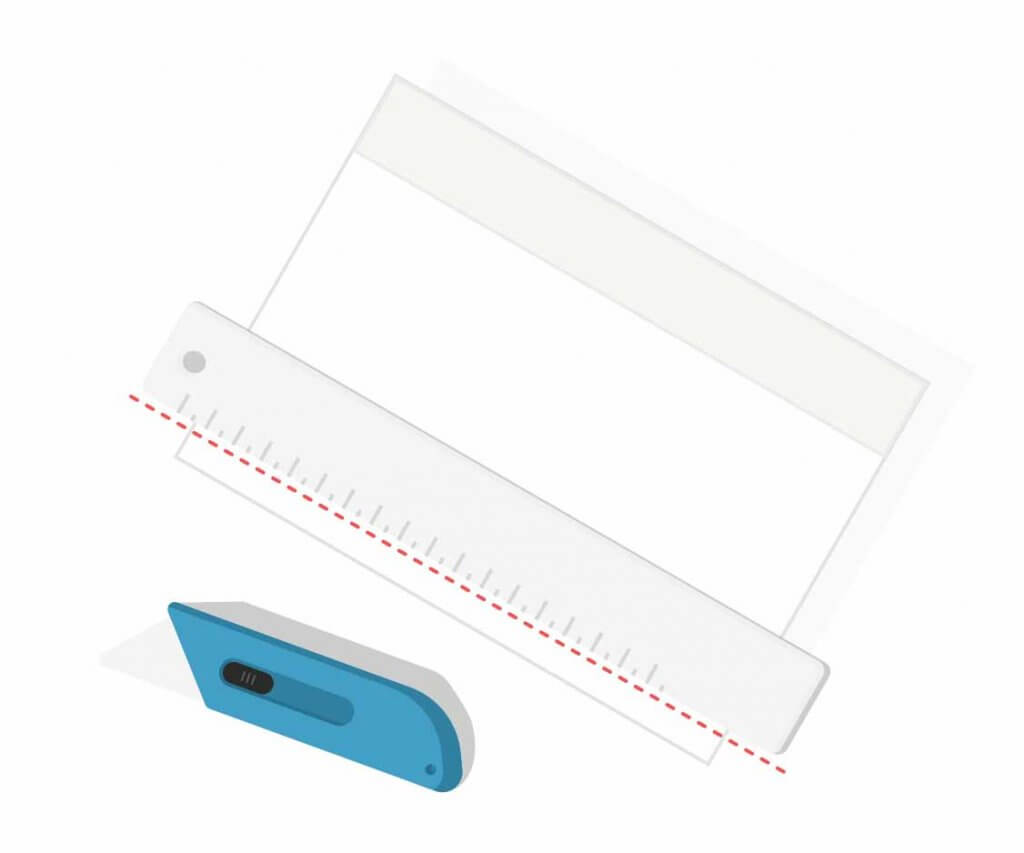
In the best case, you will only need to trim the edge opposite the spine.
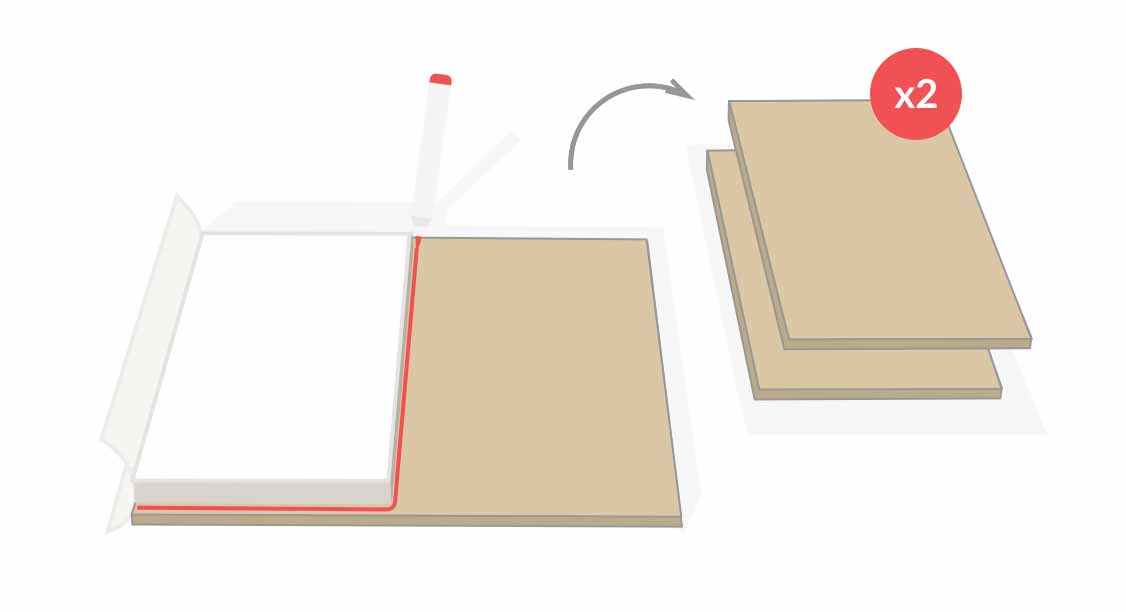
5. create the board book cover
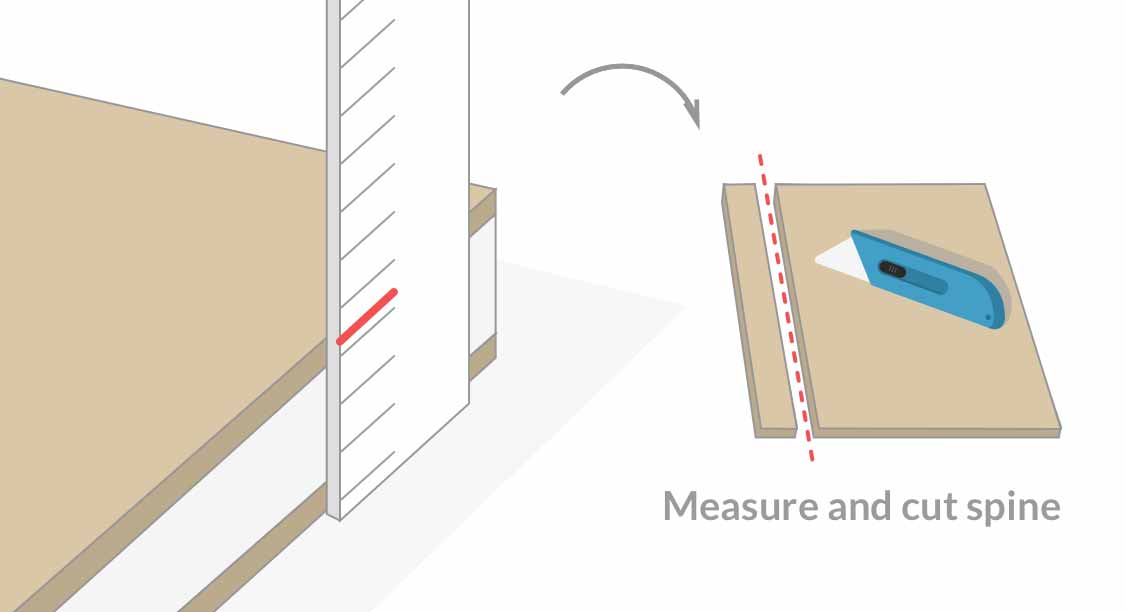
Use your stack of folios to measure two identical hard covers on your cardboard pieces. ideally, they should be about a millimeter larger than your pages.
Next, measure a backbone. It should be the same height as the front and back covers, while the width of the spine should be equal to the thickness of the bound pages and both covers.
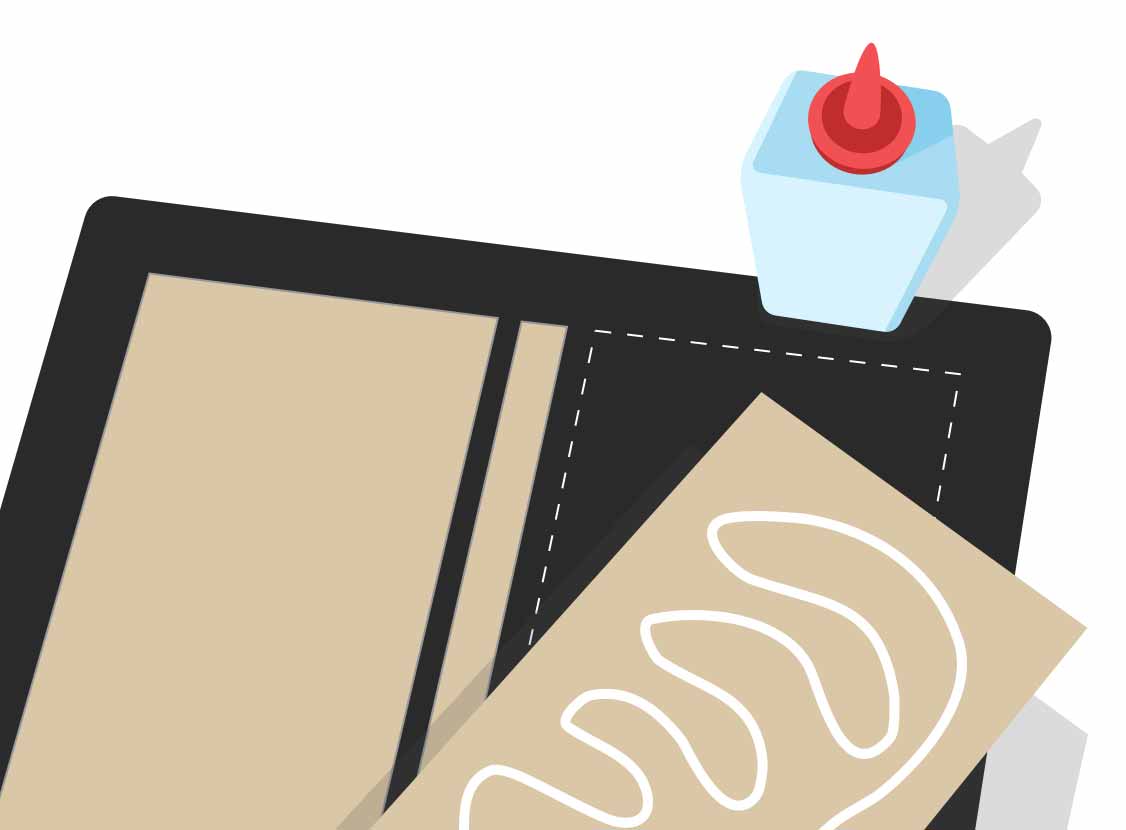
Using Elmer’s Glue (or PVA), glue the front and back covers and spine to the paper or book cover material. leave one and a half times the thickness of the card between covers and spines). there should also be an inch of extra material around all sides. make sure the glue is evenly distributed and use a credit card to remove any bubbles that may have formed.
apply more glue to the inside of the cover and wrap the material like this:
6. put the pieces together to make your book
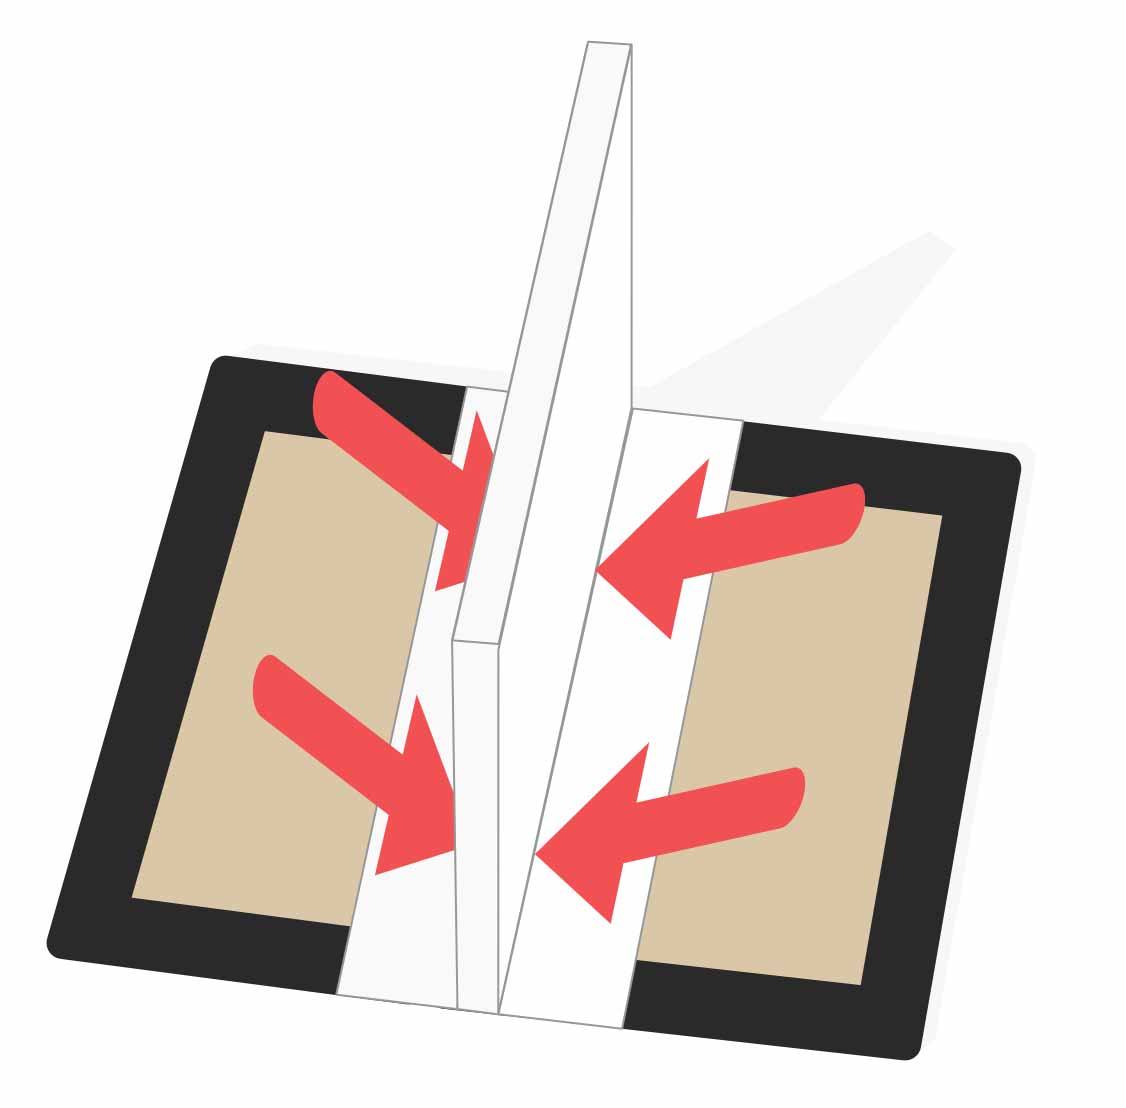
This part is a bit finicky and will have a lasting impact on readability. the bound folio will now be attached to the hardcover. loose fabric wings on both sides of the spine will be glued to the front and back covers with elmer’s tail.
Warning: No glue should touch the spine board or the fabric on the spine of your package. make sure they don’t stick together in any way.
Let them dry for an hour or two. keep covers open and clear of pages. the best way to do this is to lay him on his back and support his body with other hardcover books.
Take the decorated liner paper and trim it so it can be glued flush to the first page. then, when the book is ready, apply a thin layer of glue to the cover and the first page, and stick it to the liner paper. (Note that the amount of glue shown in the diagram is for illustration purposes only. Use enough glue to cover the entire surface and ensure a solid bond.)
repeat this process with the back cover.
7. design a dust jacket
Once you’ve put all the pieces of your book together, an optional but highly recommended (and fun) final step is to design an awesome dust jacket for it. A dust jacket can not only tie the project together (and protect your cardboard hardcover from damage), but also add a finishing touch so your DIY book matches any professionally made book on the market.
A bare hardcover can be beautiful on its own, but common practice is to create a dust jacket that captures the essence of the book and clearly highlights what it’s about. maybe you’ve created your own version of your favorite public domain book because you can’t find any covers you like? this is your chance to rectify that.
You can design a dust jacket yourself in book cover design software like canva or indesign, or you can hire a professional designer to make your final product stand out on your shelf.
and there you have it! a beautiful piece of art that will take pride of place on your bookshelf, and you made it yourself. Congratulations!
If you have any questions about making a book or using reedsy’s formatting tool, please drop us a comment in the box below.
See Also: 12 of the best bedtime books to help you sleep soundly – Tolstoy Therapy